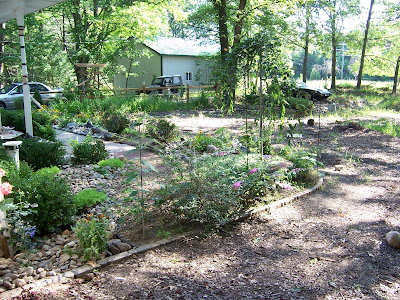
Monday, August 10, 2009

Building a cold frame & hot bed


All photos can be enlarged by clicking on them.

I have been reading about propagation & cold frames/hot beds online for a bit now. I know I need tons of stuff to fill this yard so I thought I would build a couple hot beds until I can build a proper green house.

Step 1 - Tools needed: shovel, rake & a strong back.
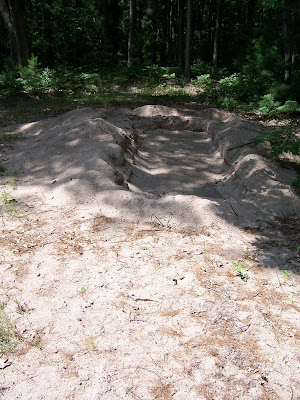
I had dug the pit to sink them in two weeks ago. Don't be a Dinkus like I was and do it when it is 80 some degrees out. Maybe that is comfortable for some of you but I die when it gets over 69.

I picked a spot facing south & where it will get some protection from the north winds. also, I will be burying it in the ground 13 inches.

I started digging a big hole. I was sweating like a pig & had to keep going in to get cooled down. The sun was blazing right on me. I should have put it off till after sundown but I wanted to get it done. I kept thinking it was a shallow grave for my Mother in law. That's the only thing that kept me going. No, just kidding. I don't have a Mother in law, It's a personal joke for a friend of mine.
:}


Step 2: Tools needed:
Figure out the amount of treated lumber for the size you are going to make it. Both deck planking, 3/4 ply & 2 X 4 corner post.
Chop saw.
Screw gun/deck screws,
3/4 Foil backed insulation.
Caulking gun & Waterproof caulk for all seams.
Waterproof Glue.

I will be constructing two separate beds. The beds are going to be 4 X 8 O.D.
I started by cutting all my wood. Front, back, sides including sloped side panels & corner posts.
I made the backs 34 inch's high & the fronts 17 inch's. The side panels are 4 ft.


I flipped them over, caulked all seams & glued foil faced insulation to cover the inside and double as an insulator and light reflector.


Step 3: Putting it together. Tools needed:
More deck screws.
Coffee/Cigs.
BFH.

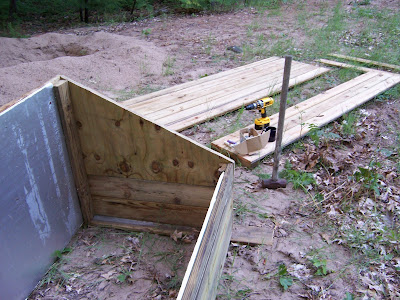
I screwed the 4 ft lower side panels on both sides in place to hold the thing together while I worked. The boards you see it sitting on are just there for something to sit on other than sand while I work on them.


Next comes the sloped side members out of 3/4 in. ply that will complete the frame.


So far so good. I just have to finish insulating the side panels and caulk all outside seams and the frames will be complete.


I have double pane storefront windows slightly larger than these beds to cover them with.
I will be laying 5 inch's of gravel in the grave for drainage, covered with matting to stop the sand from filtering into the gravel. On top of that will be 3 inch's of beach sand with my heating coils above that. Then I will lay 2 inch's of beach sand above the heat coils for dispersing the heat evenly. On top of that will be a wire mesh so I don't whack the heat cable digging around. Finally the top layer will be 6 inch's of a nice soil mix with my remote bulb for my controllable thermostat.

I haven't thought about it much but will start researching a way to rig a mister inside this thing.
Also I was thinking on putting those vents with the thermo coils that open at a certain temperature. I don't know. I don't want to spend too much time on these beds as they are temporary.

Stay tuned for the completion of my first cold frame/hot bed project.
As usual, if you see something I'm doing wrong or is a recipe for failure please post a comment.

Tuesday, July 21, 2009

Landscaping the Pentwater property

Joel. penth2o_1@charter.net
Location = Northern Michigan.
Zone = zone 6a

To began with, I am new to both the blog thing and landscaping. If you see something that can be improved PLEASE tell me. I can take criticism & could use sound advise.

The plan: Landscape this sand pit to resemble an inhabitable residence.
There are five things up here that I can get as many tons of as I need for free Sand, Wood chips, Rocks, Manure & Trees.
I started landscaping the land a little on weekends four years ago but have not got much done except cut down some 400 trees. I’m single & work way too many hours so it is slow. I did get a few rock walls started. I planted a few things to get going as I figured they would fill in and be nice by the time I got time to really go at it. (well it was more than a few things. $2,100 worth). The deer ate everything down to the ground. I gave up on it and let it sit for four years. Now I’m back in full force. I’m not quitting till I get this place in order and all the deer are either dead or trained to stay off of my property.

I am starting with 5 acres of solid wooded land. I have removed 420 trees to date to make space for a front & back yard. All I have left to start with from my previous endeavors is a stripped bed of soil, one nasty looking row of boxwood shrubs stuck in sand and a couple of partial rock walls that I started. I have nothing but sand up here. I hauled in tons of sand to make a front and back yard in the space I clearcut for both. The front yard is a mix of sugar sand and weeds. The backyard is the same. I know your going to say I am nuts for bringing in more sand but hear me out on this one.

The plan is to get close to the grade I want with the sand. On top of that I have brought in tons upon tons of wood chips along with the chipping from clear cutting the property. The chips are 1 1/2 foot deep. As the chips decay & settle (I have four years on them now) I will bring in topsoil and cover the chips with 7 inches of topsoil to hydro seed a lawn.

My thoughts are to use the sand as natural drainage and get the grade. Use the foot and a half of wood chips (duel purpose) to slow down the straight through drainage from the top soil and to turn into a thick compost underneath the topsoil. The topsoil will be 7 inches as a friend of mine told me he put 4 inches of topsoil in his backyard and 7 in the front yard. He constantly has to water the backyard with 4 inches and rarely waters on the 7 inch front yard. He told me it retains the water better so I figure a foot and a half of wood chips underneath that will hold it even better.

This is my game plan and don't know if it is a good one or not. If you see a reason why this will not work feel free to post a comment.
I wish I had taken before pics but it is not hard to imagine five acres of woods with a hole cut out in the center and filled with sand then covered with a foot and a half of wood chips.
I have a few random pics I found that show the sandpit that I'm starting with.

After clearing some trees..

Bring on the wood chips....

Making the first bed


All photo's can be enlarged by clicking on them.

I excavated a section 45x 20 x 3ft deep and covered it with 1 foot of wood chips. I then brought in truck loads of topsoil and mixed as much organic material as I could with it and started covering the bed over the chips. I now have a good size bed that is full of great soil. I laid down another foot of wood chips to keep the weeds down. I use wood chips by the ton. If you enlarge the pic you can see one major pile I've dwindled down in the background.

Don't mind the deformed Arborvitae globe in the foreground. (it was destroyed by deer) or the fact this pic was shot through a screen. (click photo to enlarge)


Now I had to find a way to fill it. I figured I would need a lot of anything I plant so I planned on using this bed as a propagation platform for certain plants.
I snagged a bunch of Lynnwood Gold Forsythias from a friend that had way too many of them for her to take care of. I lined the backside with a row of them the 45 ft length of the bed. ( I want to turn this into a hedge). The extra’s I lined along the driveway coming in.

The second row was a mixture of different types of rose’s. The third row happened by chance. A friend was re-landscaping her yard and told me I could dig anything I wanted out of her yard. I went for a pickup truck load of Tiger & Day Lilies & some type of Phlox. It stands four ft high. (I have yet to look it up). The fourth row was a mixture of low lying (6-12 inch) flowers.

This all took place four years ago.
The fricken deer ate everything down to the wood chips.
The Rose’s I pulled and threw in a pile for fill on a parking pad. The Forsythias looked pretty sad, nothing but bare sticks. The Lilies were toast. The flowers never had a chance.

I tried Liquid Fence deer repellent (actually I have tried everything) and it was working till the day I took a vacation. I came home and was pissed. Now I don’t want to look at the pretty little deer. I want them dead. I want their family dead, I want their kids dead. I want everyone of those Sob’s dead. I wish I were a hunter they would all be dead. I don’t want to go on here about my antics with deer. I’m trying to relax. I’ll write later about those Bastards.

So much for my propagation bed. I dumped another foot of wood chips on the whole bed and thought if something comes up great. I laughed at the deer when they came looking for my plants to eat. Eat the wood chips you Sob's. I moved to another home and let it sit for four years while I forgot I owned this God forsaken deer infested hole.
Fast forward four years.

I took 15 days vacation in March and another 28 days last month and have been busting my rear trying to get this property to look like the way I visualized it in my head when I bought it. I have accomplished more in this 43 days than I have in the four years I have owned it.

The bed looks like this now as I am pressuring the deer and staying on top of training them to stay away from the property. The Forsythias survived (well some of them) and have budded out with constant pruning & care. I replanted Rose Bush's with some that grow to 6 ft. The Lillie’s & Phlox have re grown & I have planted Yarrow, False Spirea, Meadow Sage, Shasta Daisy's, Spider Wort and a few other plants in the front row & any low lying leftovers from other beds.
I know your going to say spider wort is a Michigan weed but it is a neat weed.
The area that has no bed but is covered in chips will be green lawn.
(click to enlarge).

1st row = Lynnwood Gold Forsythias
2nd row = A mix of different rose's
3rd row = Tiger & Day Lillies
I had a boatload of rough cut redwood 3 X 6’s lying around for 20 years so I ripped them in half and made a trellis for the rose & topped it off with excess cedar. I have made only one so far and have not figured out how I’m going to make the rest. I’m thinking a lower cross hatch type to the left & right of the one you see then repeat high, low for a total of six for the six rose Bush's I have. I need help on this one. Feel free to post a comment. (click photo to enlarge).
I picked up a few sections of split rail and planted 12 ft rose climbers in the middle of each fence section. I'm training them to split in each direction so that they can run the rails. (click to enlarge).


The bed perimeter facing the future lawn had a one foot rock wall along it but from so much filling it was buried. I will bring it up to grade soon to finish it off. I also incorporated that rock wall with a small bed that is attached to the car pad behind it. I have no idea what I'm going to put in the small bed yet. I need to sort my rock pile and finish the wall as the rocks I have up there now are not the right size. (actually it was finished but destroyed from chasing deer with the car).
This is where I sit now with the first bed I made four years ago. It is starting to take shape and I think I have a good start on it and am glad some of it was salvageable from the hosing I took with the deer.
It is still not finished but it's a start.

Making the second bed


All photos can be enlarged by clicking on them.

This one is along the sidewalk in front of the house and adjoins the first bed made. I excavated two long rectangles 30 x 4 x 2 ft on both sides of the sidewalk and filled them with rich soil, The bed facing the yard was built up in the center to make it a mound sloping on both sides. (I don't know why, I just thought it would look better than a flat bed). I put edge trim along the cement to stop the rocks from falling then I laid down fabric, covered that with rock, threw some random large rocks in there and started planting.


I had to throw my pet rock in there as it had a little history and has been with me for 32 years.
I was backpacking in 77 at Lake of the clouds in the Upper Peninsula in Michigan. If any of you have been there you know how far & steep it is down to the bottom.

Pay no attention to that meat head in the photo. Hey it was 1977.


I saw this rock and thought it was neat. I hauled that S.o.b. on my back for two days and all the way back up to the top. There is really nothing special about it as it is just a vein of quartz and iron but I hauled it and have stubbed my toe on it lying around the house for 32 years. I'm putting it somewhere damn it. Sometimes I wonder why I saved some stuff throughout the many moves and years.


On each end of the bed I put an emerald arborvitae globe. These were beautiful at one time. I am nursing those now as I speak. Friggen deer ate those to twigs. They may have to be replaced. Did I tell you I hate deer?


On the outer side facing the lawn I wanted it to have the taller bushier plants. I put a row of perennial seed from a box in a 8 inch strip the length of the bed to see if anything came up. It all came up and now I have to thin them. I wish I knew which plants were which from seedlings so I could selectively thin. If you recognise any please feel free to post a comment.


The second row I put a mixture of different Sage (meadow,russian) along with a mixture of Corepsis (golden shower,early sunrise, Sunfire) I then mixed in firewitch & delphinium.


Meadow Sage/Blue Queen


Coreopsis/Early Sunrise.


Cheddar Pink/Firewitch.


Corepsis/Sunfire.


For the center row I staggered Hosta (plantain lily) & blanket flower. The blanket flowers got a fungus and will be ripped out. I really like those things they keep blooming the more you deadhead.


Plantain Lily


The sick blanket flowers.


I haven't figured out what to put in the last row closest to the sidewalk. I'm thinking something real low lying. I did put in a row of pink & white alyssum but found out they are annuals. I'll let them die off. I don't want to plant anything that I have to plant again. I know this sounds stupid but I'm trying to make it as much as a maintenance free yard as possible. (yeah right).


On the other side of the sidewalk I had four boxwood stuck in the sand from my previous attempt at landscaping. On each end was a potentilla bush. Those things are nasty & scrubby. They never look good even at their best. The deer had destroyed this row. I hate deer.


I had to think of what to do with this section. I didn't come up with anything so I threw more soil, fabric and rocks. I wung the potentilla's in the burn pile and put in two Golden Privet on each end of the boxwoods.
Well that's the second bed. I do have a small square at the start of the sidewalk up to the house but I have not really thought about that one. I want to finish these other beds completely before I start bouncing around again and end up with nothing finished.
I was thinking something with running water though as it is right under a bedroom window.
I will yank that deer eaten arborvitae & start fresh.

Extending the second bed


All photos can be enlarged by clicking on them.


This bed is really a continuation of the one along the sidewalk up to the house.
I wanted something to attract bees, butterflies and hummingbirds. It is working as I have all three of them in abundance.

To keep the adjoining bed flowing I made the same mound with sloping sides and planted the same plants in the same order. outer edge = perennial seed from a box. outer = corepsis, sage, firewitch, & delphinium. middle = blanket flower & hosta. inner edge = low lying.


At the entrance to this bed I dug two 4' x 10" x 3' trench's and filled them with chert. I'm thinking this will let any oils or whatever would kill plants drain off the sidewalk & into the ground before it hits the bed. Actually I don't know why I did it. What the hell kind of oils are coming off my sidewalk & gonna kill my plants. Anyways it looks good.

A friend ripped her porch down so I ended up with a dump truck load of red brick and busted cement in the front yard. I was going to use it as fill in the back but with my trusty rock hammer from the 70's the cement flaked off the bricks quite easily. I put down a brick pad going into the bed and another one going out to the lawn. (well soon you will see the one going to the lawn).


Wow, I'm looking at these photos & realize I should have done a clean up before taken pics. There is some of her cement around that tree and a large pile way out in the background. I'll get to that later. It makes me sick every time I look at these arborvitae globes. They were real nice before the deer chowed them. I'll hold off on replacing them to see if they come back but I got a feeling these are going to get transplanted in the back some where.

Usually I don't like the look of broken cement. I was going to use it for fill in the back. I made it as far as this tree, butted up a yard rake against the tree and rotated it around the tree to get my radius while laying the chunks of cement. Funny how a really hot day can change your work load. It was a lot easier than humping it all the way to the backyard. I need to figure out what to fill it with. I know the outer edge will get something that flows downward to hide the cement.
My friend owns a wine shop and was throwing out this bike wine display. It has a bunch of baskets on it to hold the wine. I need to find planters for the baskets, paint it a wild color & throw it up on the bed with vibrant colored plants and vines covering the frame. This will be the only annuals I will have on the property. The bed is pretty high but when I lay wood chips and bring in 7 inchs of topsoil for the lawn it will be the right height.


Entering the bed, the left side continues the same as along the sidewalk up to the house.


It ends short where I made a big mound for a weeping cherry tree under planted with wooly veronica stepables. The outer edge along the whole bed has that boxed seed mentioned earlier. I switched to foxglove and delphinium mixed with firewitch and corepsis continuing around the outer curve.


Delphinium (magic fountains) They already bloomed and I collected the seeds but after I whacked it down it is coming back for a second bloom. GOOD.


Foxglove (Camelot Lavender) They bloomed also and the seeds were taken.


And I can't forget my hummingbird feeders I picked up while in Italy. They are kind of neat. They have the regular feeders along the top that is a separate bowl inside to hold the liquid and the big opening lower towards the bottom holds seed. Unless I missed the boat and that hole is for something else. I was wondering why a seed feeder on a hummingbird feeder. Oh well it looks good. I have four of them throughout the yard.


The center consist of stepping pads made from the brick of my friends porch. I have to break out my rock saw to trim the end pieces of the platform along with the blocks that I used for the border edging of this bed.


The walkway is filled with another neat stepable called sedum purple form. It is growing slower than I thought it would. This will fill in like the wooly veronica around the weeping cherry and feel good on the bare feet. You can't see it but there are about 100 or so pieces of the plant in between the bigger ones you see. I took a couple plants and pulled apart each stem and spaced them all over to get it to fill in quicker.


At the end of the path I put in three butterfly bush's.


One pink delight that blooms duh! pink.


One nanho purple compact. I think this one was mislabeled. It doesn't look like the picture on the tag.


And one called assorted. It is an assortment of spikes that should bloom white, pink, a dark purple and red. I think I got robbed on this one. It has not bloomed yet but I got a feeling.


On the right side of this bed closest to the house I continued on with the privet at the end of a boxwood hedge same as the sidewalk in front of the house.


In front of that I made a big mound in a triangular shape, covered it in fabric & rocks.


I still need to fill this in but I put a lemon coral sedum at each point. Towards one point I put hens & chicks green and red. On the other point I have a little alpine strawberry a friend gave me.


A lady was throwing this pedestal away. I asked her what she had on top of it. She replied that she had kept it for so long and could never find the right top for it. I told her I would. I have had it for two months now and I cannot find the right top. I want a bird bath. I have looked everywhere and nothing clicks. Terra won't work. The urn type won't either. I cannot find the right thing that clicks in my head. I was thinking a slim hammered copper bath. I don't know maybe I will end up winging it down the road. I thought if I hung on to it I would know the right thing when it came along. Friggen snows gonna be flying by the time I do.


At the end of the boxwood hedge I have an Rose bush, Delphinium and another sick Blanket flower plant.


Rosa (American)


Delphinium (Bellamosum)


I have a long ways to go on this but it is a good start and I have come a long way in a short time.